
The modules supports
There are 2 types of these 3 arms stars which I build with Sintra. Small pieces of styrene are engraved and glued to add the details, as well as locating nipples for the modules. The moulds are produced in 2 parts. I envisaged to cut out thanks to a metal gauge the 0,75 mm styrene flasks which come on each side of the supports, but their cutting is more than risky! I am obliged to mould them at the same time as the supports. The central modules supports, whose that more imposing supporting the antenna, have a square form. They are cut out in Sintra then moulded.
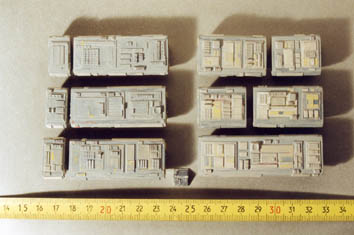
The modules
The many modules along the spine are 5 different lengths, plus the one supporting the antenna. These 5 types are well represented in the Lunar Models and Planet X models, but each type which is found several times have the same details, contrary to the models produced for the movie. I decide to build 3 different models for each length (except for the large one and the antenna module) with different details. The mixing of the modules will reinforce this impression of difference. They are cut out with the jigsaw in MDF, painted then sanded. Their details are done with the already mentioned technique of the cardboard glued, and with the gluing of small styrene parts. The form of those is printed in plasticine, not drying modelling clay, then the styrene dissolved in trichlore is cast in these " moulds ". It is a long-term work considering the number of modules to be detailed, therefore I remove 1 model for 2 types.

A " triangle " located at the end of the modules is built with Sintra, with engraved details and grid out of styrene casted on a medicine packaging. As I mould the modules, this part is glued on each module. I also produce a mould of it since it is found 2 times on the large modules.
The module supporting the antenna has a different shape, it is much more imposing. I thicken it with Sintra glued on the MDF base shape. Pieces of a MDF turned cone are glued on the top, according to the documents. The fastening feet of the antenna base are carried out with a cone chamfered with a turned PVC tube, glued on its support cone then cut out with the minidrill.

Serial castings
The total number of modules to cast in resin is 62, without counting the antenna module, the supports, joining parts, etc...
I already said what I think of the odourless resin G20, but it has a major fault anyway: the catalyst dries very quickly once the box is open. Result, mine became dry at the end of 2 weeks, whereas I had used only 700 G of resin on the 1 kg of the pot! What stops the casting prematurely! Conclusion, I must prepare all my moulds before beginning the casting process, it will thus be necessary that the engine block, the new pod and various small parts moulds are ready for the next (and last) time I will cast.
A detail jumps me to the eyes when the antennas are casted, they are too small and the details are not up to certain parts already casted! So I must also rebuild them... I decide to change my technique and to try vacuumforming and photoetching. If it goes as envisaged, I would be able to obtain very fine antennas and stiffeners without faults, in a very short time. The technique will also make it possible to build other parts like the grids at the rear of engines...